Posts

Assessment 3 Torus Tutorial

Image
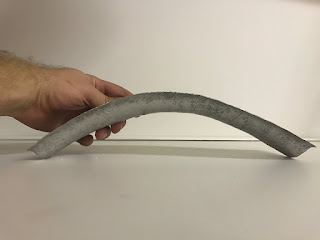
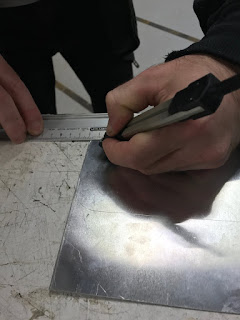
This shape i found to be the most confusing shape that we needed to make. A torus is a three dimensional (3D) donut-shaped geometric shape.  One attempting to make a new shape or learn a new skill its always important to have a plan. This is the basic thinking that is needed. 1. How to create something efficiently in terms of amount of material needed and time needed. (Its important to set these variables straight aways as they will be your guide on your project) 2. Mark the sheet according to the shape your are trying to make. plan out where you want to stretch and where you want to shrink. any places your plan to  manipulate  should be marked. 3. Think about your work process and the end result. Metal on Metal never leaves for a good looking product at the end.  4. always ask for help or a second opinion. when working on a project for a long period of time it may be hard to stay focused on the important thinks. you may spend to much time on one thing mean you don't have t

Assessment Two Ferrari 250 GTO

Image
Assessment Two saw the class split into groups of six. once the groups had been selected they then went off to talk about the assessment task. 'As a team students will create a scale template for a Ferrari 250 gto and then divide it into equal portions. As individuals they will create an aluminium skin to adhere to their portion of its contours.' The first step of this assessment task was to create the template for our group to work on. This was a challenging task at first as the  program  that we were given was not available any more as well as the fact that it was our first time using this program. However once this problem was over come we then spliced the 3D digital template, allowing for us to create a waffle structure.  Once that was done we then placed tape over the model in order for us to visualise the car correctly This gave us a better understanding of how each panel would look as well as where each piece had to curve. Once this was done we then

The Blister

Image
This week saw an introduction into a new machine that we had not yet used which was the CNC Machine. This assisted in the making of the Blister The Process: Step 1: We began with the templates being cut out for us. then we had to pick what shape we wanted to create. Step 2: once we had picked what shape we wanted we then cut the aluminium into the appropriate size for the template. This was then squished between the two pieces that was cut out from the CNC machine. Then it was just a matter of hitting the aluminium into the void underneath. Previous week when using a metal hammer i realised that it leaves marks on the material so i tried wrapping a cloth around my hammer to reduce this Step 3: once i had created my blister i took it out of the template and then cut the excess material off, in order to just have the blister shape. once that was done it was just a matter of making it smooth and nice. Final:

The Tray

Image
This week saw us pair into groups to make tray. The aim was to make a tray that was identical to your partners. I paired with Eoin Campbell. The Process: Step 1: This was the beginning of our design so we had to determine what size we wanted the tray to be at. once we decided we then had to measure the aluminium and cut out the tray  Step 2: we then cut out a wooden block as a template which we could use to form the tray around in order to create unity between our two trays. Step 3: once these templates were cut out we places them in the vice and began to start hitting it with the appropriate hammer. Starting with the sides then moving onto the curves.  Step 4: after this it was just about correcting any mistakes that were hit into the metal, and adjusting the corners so that they were correct. Final product: